How To Draw A Wolf: A Step-by-Step Guide For Beginners
Alright, listen up, folks. If you're here, chances are you're ready to dive into the world of sketching and want to know how to draw a wolf. And trust me, it's not as scary as it sounds. Drawing a wolf can be super rewarding, especially when you break it down into simple steps. So, grab your pencils, a clean sheet of paper, and let’s get started. This guide is packed with tips, tricks, and techniques to help you master the art of drawing wolves in no time.
Now, before we jump into the nitty-gritty, let’s talk about why learning how to draw a wolf is such a cool skill. Wolves are majestic creatures, and capturing their essence on paper can be an incredible experience. Whether you’re into realistic drawings or more abstract styles, wolves offer a lot of creative freedom. Plus, they’re just plain awesome, right? So, buckle up, and let’s make some art magic happen.
By the end of this article, you’ll have all the tools and knowledge you need to create stunning wolf drawings. We’ll cover everything from basic shapes to advanced shading techniques, so even if you’re a total beginner, you’ll be good to go. Let’s make sure you’re not just drawing a wolf but creating something that truly reflects the spirit of these incredible animals. Ready? Let’s go!
Read also:Best Soul Food Near Me A Flavorful Journey Through Southern Comfort
Table of Contents
- Why Learn How to Draw a Wolf?
- Tools You’ll Need to Get Started
- Breaking Down the Wolf’s Form with Basic Shapes
- Creating the Outline of Your Wolf
- Adding Detail to the Eyes
- Mastering Fur Texture and Patterns
- Shading Techniques for Depth and Dimension
- Adding the Final Touches
- Common Mistakes to Avoid
- Tips for Advanced Artists
Why Learn How to Draw a Wolf?
Let’s face it, wolves are not just any animal—they’re symbols of strength, loyalty, and freedom. Drawing a wolf allows you to explore these themes and express them through your art. It’s like telling a story without words, and who doesn’t love a good story? Plus, wolves have such unique features—those piercing eyes, sharp teeth, and flowing fur—that make them a fantastic subject for artists of all levels.
Another cool thing about learning how to draw a wolf is that it helps improve your overall drawing skills. You’ll practice proportions, textures, and shading, which are essential for creating realistic artwork. And hey, if you nail this, imagine what else you can conquer in the art world!
Wolves in Art: A Brief History
Wolves have been a popular subject in art for centuries. From ancient cave paintings to modern digital illustrations, these creatures have captivated artists and audiences alike. Understanding the cultural significance of wolves in art can add depth to your work and inspire you to create something truly unique. So, while you’re learning how to draw a wolf, take a moment to appreciate the rich history behind it.
Tools You’ll Need to Get Started
Alright, let’s talk gear. To start drawing a wolf, you don’t need anything fancy. Here’s a quick list of what you’ll need:
- Pencils (HB, 2B, 4B, 6B)
- Eraser (both kneaded and standard)
- Blending stumps or tortillons
- Sketchbook or drawing paper
- Optional: Colored pencils or markers for adding color
These tools will give you the flexibility to create different textures and shading effects, which are crucial when drawing a wolf. Don’t stress too much about having the most expensive supplies—what matters is your technique and creativity.
Breaking Down the Wolf’s Form with Basic Shapes
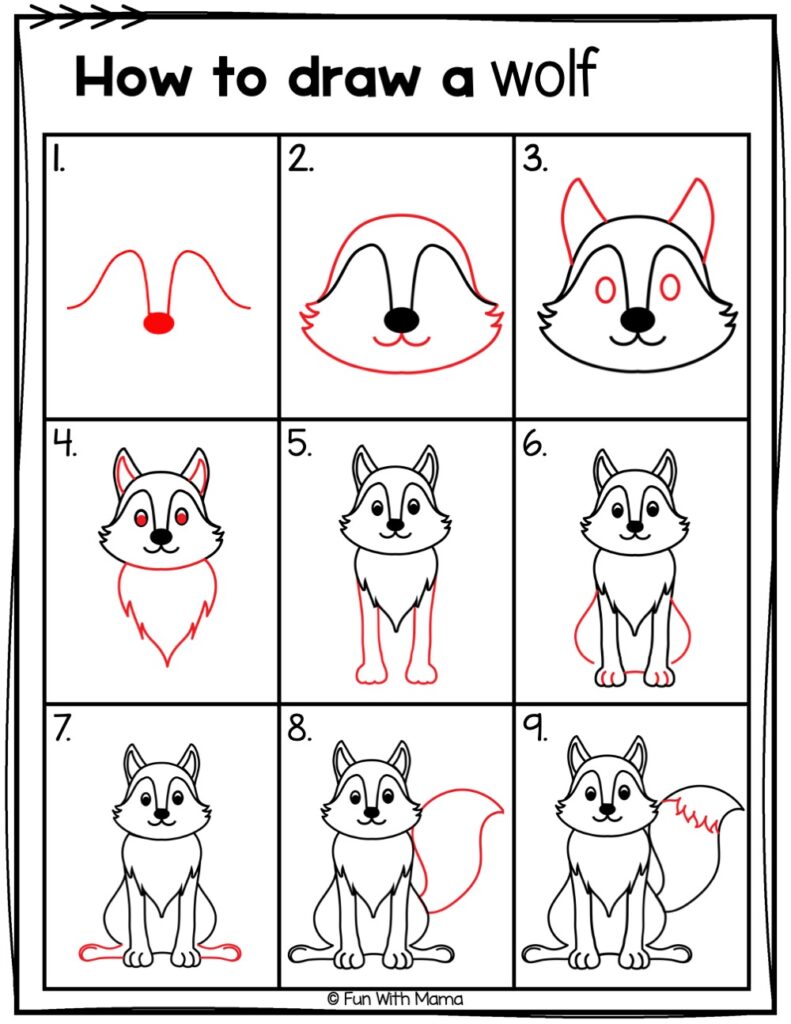
One of the easiest ways to start drawing a wolf is by using basic shapes. This approach helps you establish the overall structure before diving into details. Here’s how you can do it:
Read also:Oi Oi Oi Baka The Ultimate Guide To Understanding This Catchy Phrase
- Begin with an oval for the body.
- Add a smaller circle for the head.
- Connect the two shapes with curved lines for the neck.
- Sketch four lines extending downward for the legs.
- Draw a long, curved line for the tail.
These shapes will serve as your foundation, making it easier to add details later on. Remember, it’s okay if your initial sketch doesn’t look perfect—this is just the starting point.
Understanding Wolf Anatomy
To make your wolf drawing more realistic, it helps to understand the anatomy of a wolf. Pay attention to the proportions of the head, body, and legs. Wolves have long, slender bodies with powerful muscles, so try to incorporate those elements into your drawing. This knowledge will elevate your artwork and make it stand out.
Creating the Outline of Your Wolf
Once you’ve got your basic shapes down, it’s time to refine the outline. Start by smoothing out the edges and adding curves to give your wolf a more natural appearance. Here are some tips to keep in mind:
- Focus on the flow of the body—wolves are sleek and agile, so their lines should reflect that.
- Pay attention to the angles of the legs and paws. Wolves have strong, sturdy legs that support their weight.
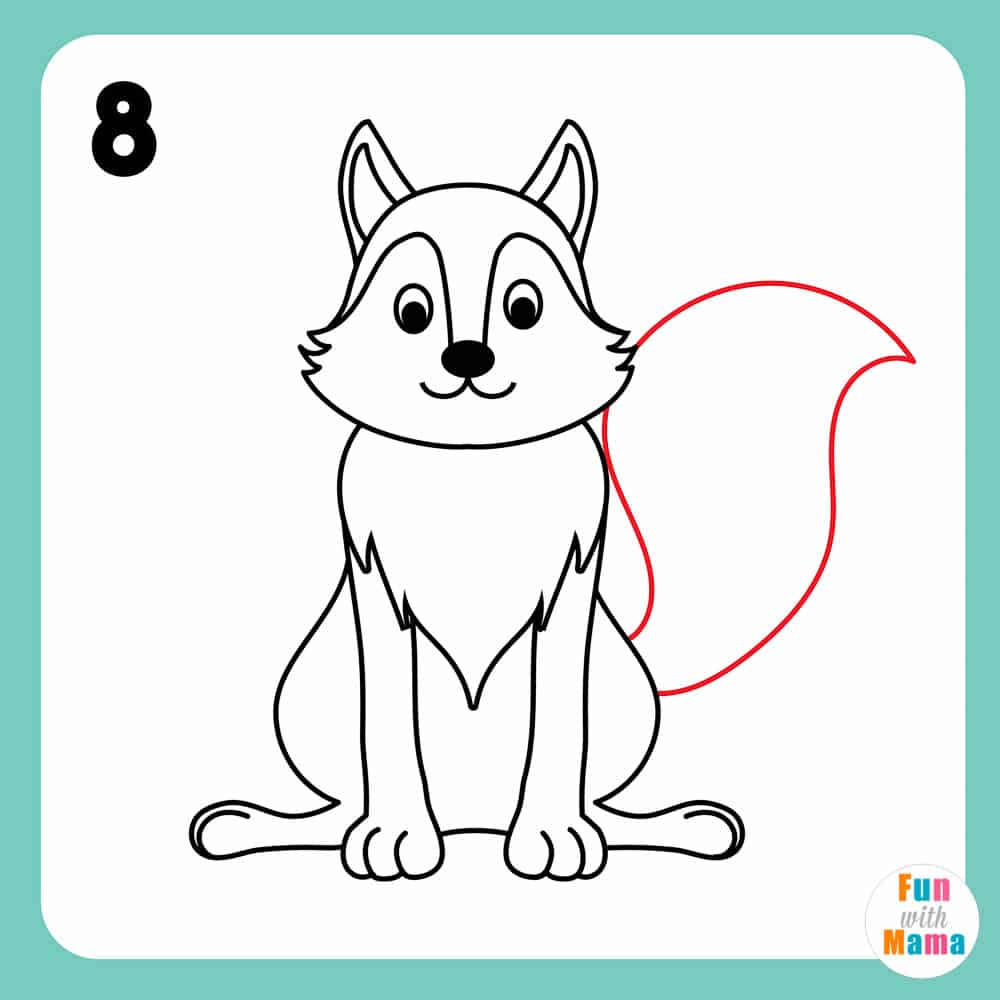
- Don’t forget the tail! Wolves often carry their tails low, so make sure it follows the natural curve of the body.
Taking your time with the outline will save you a lot of headaches later on. It’s like laying the foundation for a house—if it’s solid, everything else will fall into place.
Proportions Matter
When creating the outline, proportions are key. Wolves have distinct features that set them apart from other animals, so try to capture those in your drawing. For example, their heads are narrower compared to dogs, and their ears are more pointed. These small details can make a big difference in the final result.
Adding Detail to the Eyes
The eyes are often referred to as the windows to the soul, and that’s especially true when drawing a wolf. Capturing the intensity and depth of a wolf’s gaze can bring your drawing to life. Here’s how to do it:
- Start by sketching almond-shaped eyes, positioned slightly toward the front of the head.
- Add the pupils, making sure they’re centered and aligned.
- Include highlights to give the eyes a reflective, lifelike quality.
- Draw the fur around the eyes to frame them and add realism.
Remember, wolves have sharp, intelligent eyes, so try to convey that in your drawing. It might take a few tries to get it right, but patience is key.
Expressing Emotion Through the Eyes
Wolves are known for their expressive eyes, and you can use this to your advantage in your artwork. Whether you want to convey curiosity, aggression, or calmness, the eyes can help you achieve that. Experiment with different expressions to see what works best for your drawing.
Mastering Fur Texture and Patterns
Fur is one of the most challenging aspects of drawing a wolf, but with the right techniques, you can create realistic textures that look amazing. Here’s how to tackle it:
- Use short, quick strokes to mimic the texture of fur.
- Vary the pressure of your pencil to create different shades and depths.
- Add directional lines to follow the natural flow of the fur.
- Incorporate patterns like stripes or spots if you’re drawing a specific breed of wolf.
Practice makes perfect when it comes to fur texture, so don’t be afraid to experiment and find what works best for you.
Layering Techniques
Layering is an essential technique when drawing fur. Start with light strokes and gradually build up the layers to create depth and dimension. This will give your wolf’s fur a more realistic and three-dimensional appearance.
Shading Techniques for Depth and Dimension
Shading is what brings your drawing to life, and it’s especially important when learning how to draw a wolf. Here are some shading techniques to try:
- Use cross-hatching to create darker areas.
- Blend with a blending stump for smoother transitions.
- Leave some areas lighter to create highlights and contrast.
- Pay attention to the light source to determine where shadows should fall.
Shading can be tricky, but with practice, you’ll be able to create stunning effects that enhance your wolf drawing.
Creating Contrast
Contrast is key when shading a wolf. By balancing light and dark areas, you can make your drawing pop. For example, the fur around the eyes might be darker, while the chest area could be lighter. These subtle differences can add a lot of depth to your artwork.
Adding the Final Touches
Now that you’ve got the basics down, it’s time to add the finishing touches. This is where you can really let your creativity shine. Here are a few ideas:
- Add a background to give your wolf context—maybe a forest or a snowy landscape.
- Incorporate details like whiskers, claws, and teeth for added realism.
- Experiment with color if you’re using colored pencils or markers.
These final touches can take your drawing from good to great, so don’t skip this step!
Personalizing Your Art
One of the best things about art is that it’s personal. Feel free to add your own flair to your wolf drawing. Maybe you want to give it a unique pattern or incorporate elements from your own life. The possibilities are endless, so have fun with it!
Common Mistakes to Avoid
Even the best artists make mistakes, but being aware of them can help you avoid common pitfalls. Here are a few things to watch out for:
- Ignoring proportions—make sure the head, body, and legs are in proportion to each other.
- Overworking the fur—sometimes less is more when it comes to texture.
- Forgetting the details—those small touches can make a big difference in the final result.
Learning from your mistakes is part of the process, so don’t get discouraged if something doesn’t turn out the way you hoped. Just keep practicing!
Tips for Advanced Artists
If you’re already comfortable with the basics, here are some tips to take your wolf drawings to the next level:
- Experiment with different mediums, like charcoal or watercolor.
- Study photos of real wolves to better understand their anatomy and behavior.
- Challenge yourself by trying different styles, such as abstract or impressionistic.
Being an advanced artist doesn’t mean you stop learning—there’s always room for growth and improvement.
Pushing Your Limits
Don’t be afraid to step outside your comfort zone and try new things. Whether it’s a new technique or a completely different style, pushing your limits can lead to incredible results. Who knows, you might discover a new favorite way to draw wolves!
Conclusion
And there you have it, folks—a comprehensive guide on how to draw a wolf. From basic shapes to advanced shading techniques, we’ve covered everything you need to create stunning wolf drawings. Remember, practice is key, so keep sketching and experimenting with different styles and approaches.
Before you go, I’d love to hear from you. Did you find this guide helpful? What’s your favorite part about drawing wolves? Leave a comment below and let’s chat. And if you enjoyed this article, don’t forget to share it with your fellow art enthusiasts. Happy drawing, and see you in the next one!

