How To Draw A Horse Like A Pro: The Ultimate Guide For Artists
Have you ever wanted to learn how to draw a horse but didn’t know where to start? Drawing a horse can seem intimidating at first, but with the right guidance and practice, anyone can master it. Whether you're a beginner or an experienced artist, this guide will walk you through every step of the process. So grab your pencil and let’s dive in!
When it comes to drawing animals, horses are some of the most majestic and challenging subjects. Their elegant curves, strong muscles, and expressive features make them a favorite among artists. But don’t worry if you’re just starting out—this guide is designed to break down the process into simple, easy-to-follow steps.
By the end of this article, you’ll have all the tools and knowledge you need to create stunning horse drawings. We’ll cover everything from basic anatomy to advanced shading techniques. Let’s saddle up and get started!
Read also:Couple Under Blanket Nyc Park A Romantic Escape In The Heart Of The Big Apple
Why Learning How to Draw a Horse is Important
Before we jump into the nitty-gritty details, let’s talk about why learning how to draw a horse is such a valuable skill. Horses are not just beautiful creatures; they’re also symbols of freedom, strength, and grace. Mastering their form will improve your overall drawing abilities and give you a deeper understanding of animal anatomy.
Understanding Horse Anatomy
The key to drawing a convincing horse lies in understanding its anatomy. Horses have a unique body structure that combines power and elegance. Here are some important points to keep in mind:
- Horses have long, slender legs with powerful muscles.
- Their necks are curved and flexible, allowing for a wide range of motion.
- Their heads are proportionate, with large eyes and a delicate muzzle.
- Pay attention to the placement of joints and bones, as these will guide your lines.
Studying anatomy doesn’t mean you need to memorize every bone and muscle, but having a general idea of how a horse’s body works will make your drawings more realistic.
Basic Materials You’ll Need to Draw a Horse
Now that you understand the importance of anatomy, let’s talk about the materials you’ll need. You don’t need anything fancy to get started—just the basics will do. Here’s what you’ll need:
- A good quality pencil (HB or 2B works great).
- A sketchbook or drawing paper.
- An eraser (a kneaded eraser is ideal for detailed work).
- Optional: charcoal, colored pencils, or digital drawing tools if you want to experiment later.
Remember, the quality of your materials matters less than your technique. Even the simplest tools can produce amazing results with practice.
Step-by-Step Guide on How to Draw a Horse
Let’s break down the process of drawing a horse into manageable steps. This method works for both beginners and advanced artists.
Read also:Funny Bunny Nail Polish Hopping Into Style And Laughter
Step 1: Start with Basic Shapes
Begin by sketching basic shapes to establish the horse’s proportions. Use circles and ovals for the body, head, and legs. Don’t worry about perfection at this stage—these shapes are just a guide.
Step 2: Add Details to the Outline
Once you have your basic shapes, start refining the outline. Define the curves of the neck, back, and legs. Pay attention to how each part connects to the next.
Step 3: Define the Facial Features
The horse’s face is one of its most expressive features. Start by adding the eyes, nose, and mouth. Remember to keep the proportions balanced and symmetrical.
Step 4: Refine the Body and Muscles
Now it’s time to add the muscles and contours of the horse’s body. Study reference images to see how the muscles flow and connect. This step will give your drawing depth and realism.
Step 5: Add Shading and Texture
Shading is what brings your drawing to life. Use light and dark tones to create dimension and texture. Pay attention to how light hits the horse’s body and use that to guide your shading.
Step 6: Final Touches
Once you’re happy with the overall shape and shading, add any final details like fur, mane, and tail. These small touches can make a big difference in the final result.
Tips and Tricks for Drawing a Horse
Here are a few tips to help you improve your horse drawings:
- Study reference photos to better understand horse anatomy.
- Practice drawing horses from different angles to improve your skills.
- Experiment with different shading techniques to find what works best for you.
- Don’t be afraid to make mistakes—every artist learns through trial and error.
Remember, practice makes perfect. The more you draw, the better you’ll become.
Common Mistakes to Avoid When Drawing a Horse
Even the best artists make mistakes, but being aware of common pitfalls can help you avoid them. Here are a few things to watch out for:
- Incorrect proportions: Make sure the horse’s body parts are in proportion to each other.
- Stiff poses: Horses are dynamic creatures—avoid making them look rigid or unnatural.
- Over-detailing: While details are important, too much can overwhelm the drawing. Focus on what’s essential.
By keeping these mistakes in mind, you’ll be able to create more realistic and lifelike horse drawings.
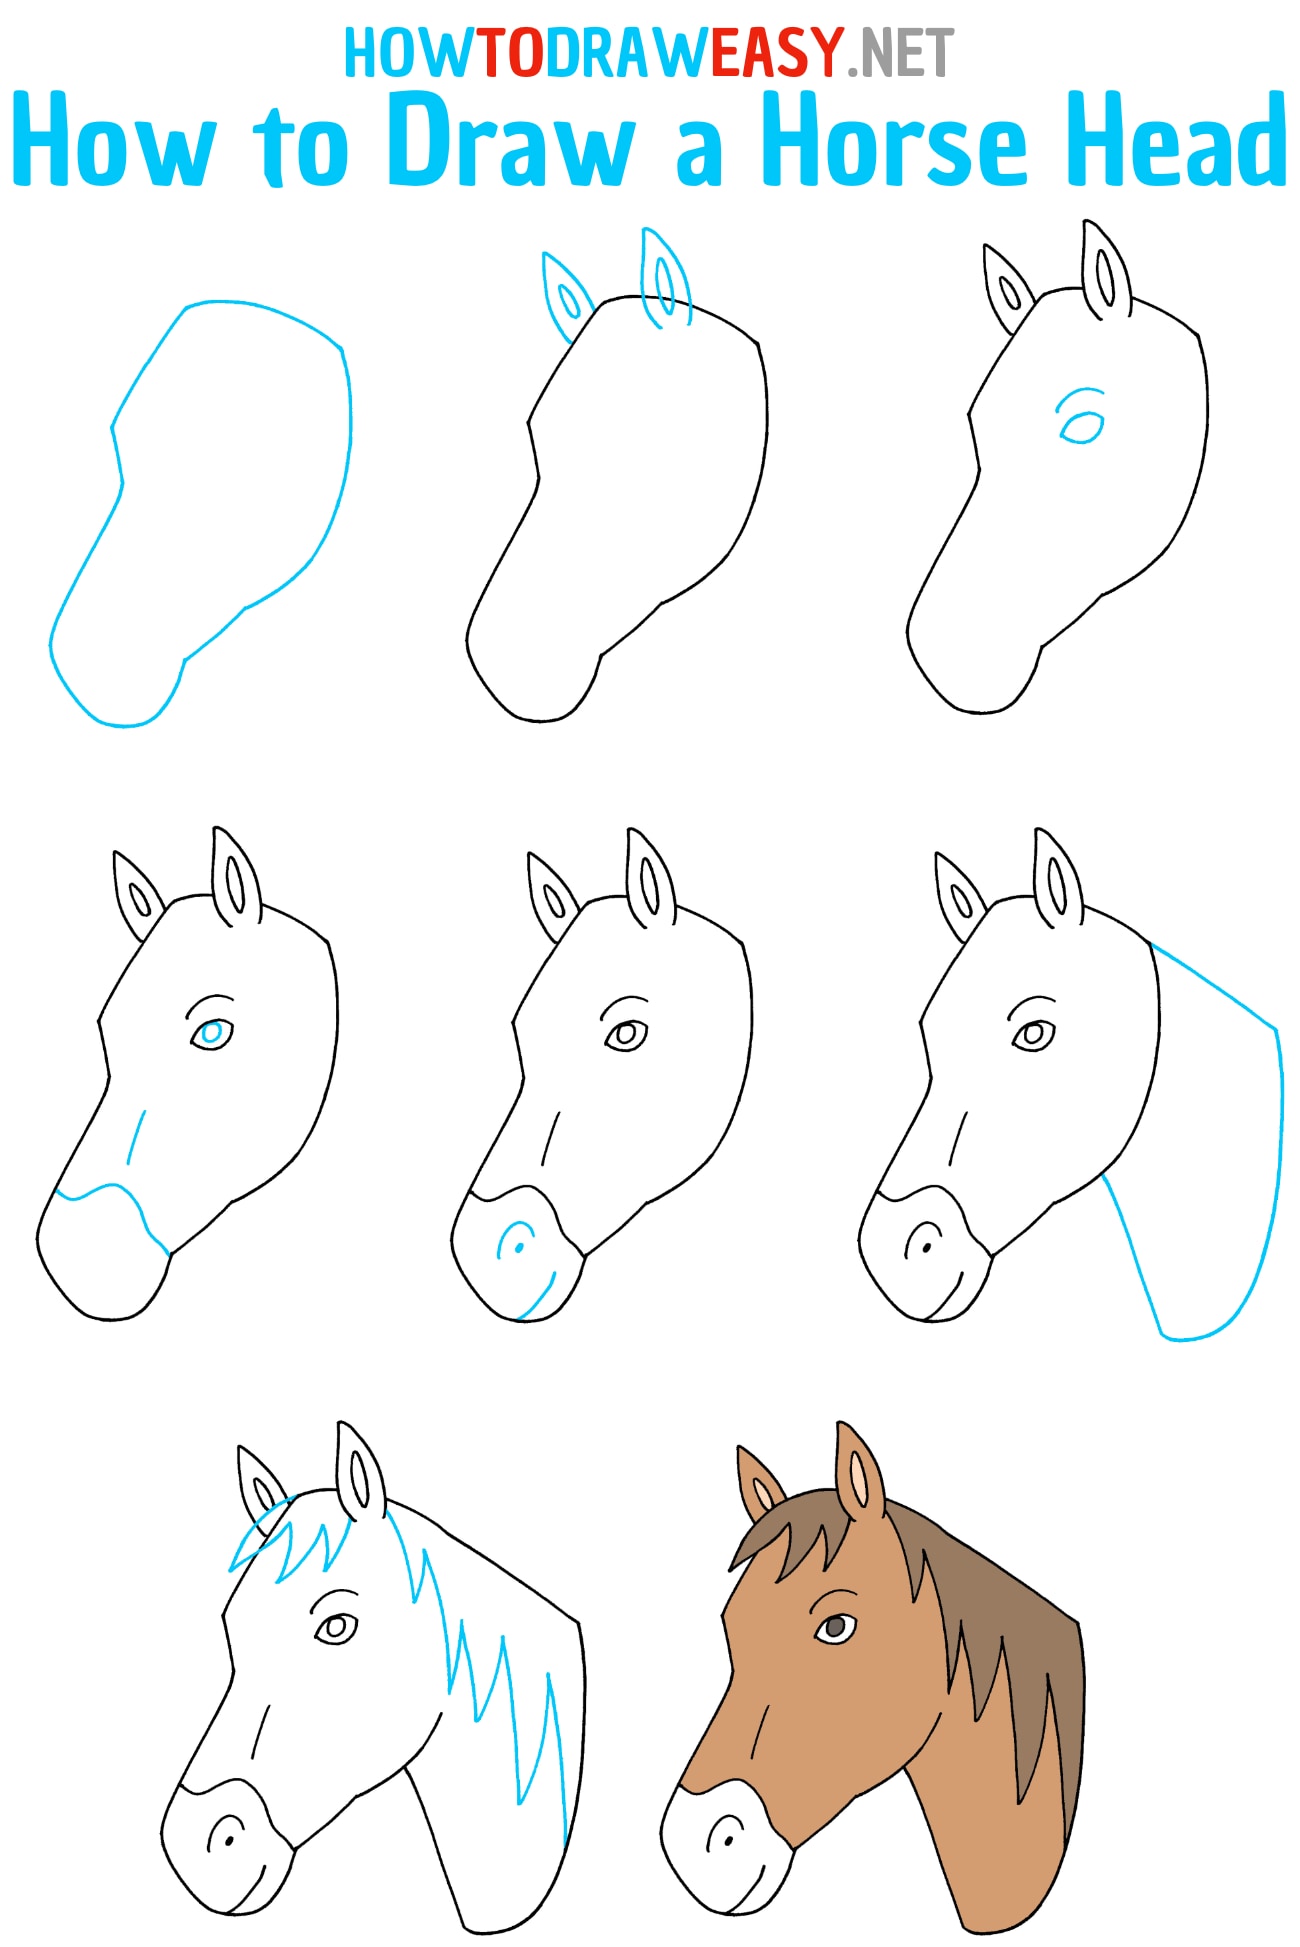
How to Draw a Horse Head
The horse’s head is one of the most challenging parts to draw, but with the right approach, you can master it. Here’s a step-by-step guide:
Step 1: Sketch the Basic Shape
Start with a large oval for the main part of the head and a smaller oval for the muzzle. Connect them with gentle curves.
Step 2: Add the Eyes and Ears
Place the eyes on the sides of the head, slightly angled. Add the ears at the top, making sure they’re symmetrical.
Step 3: Define the Nose and Mouth
Draw the nostrils and mouth, keeping in mind the horse’s delicate features. Use light, gentle lines to avoid making the face look too harsh.
Step 4: Refine the Details
Add shading and texture to bring the head to life. Pay attention to the subtle curves and contours of the face.
How to Draw a Horse in Motion
Capturing a horse in motion is a great way to add excitement to your drawings. Here’s how to do it:
Step 1: Understand the Basics of Horse Movement
Study how horses move—whether they’re walking, trotting, cantering, or galloping. Each gait has its own unique rhythm and posture.
Step 2: Sketch the Dynamic Pose
Use quick, loose lines to capture the horse’s movement. Focus on the flow of the body and the positioning of the legs.
Step 3: Add Details and Shading
Once you have the basic pose, refine the details and add shading to create depth and realism.
Remember, drawing a horse in motion requires practice and patience. Keep experimenting until you find a style that works for you.
How to Draw a Horse’s Mane and Tail
A horse’s mane and tail are iconic features that can add character and flair to your drawing. Here’s how to draw them:
Step 1: Sketch the Basic Shape
Start by outlining the general shape of the mane and tail. Use flowing, curved lines to capture their movement.
Step 2: Add Texture and Details
Use short, quick strokes to create the appearance of individual hairs. Vary the length and direction to add realism.
Step 3: Refine and Shade
Once you’re happy with the overall shape, refine the details and add shading to give the mane and tail depth and volume.
Resources for Learning How to Draw a Horse
If you’re serious about improving your horse-drawing skills, here are some resources to check out:
- Online tutorials and video lessons.
- Books on animal anatomy and drawing techniques.
- Art communities and forums where you can share your work and get feedback.
Remember, the more you learn and practice, the better you’ll become.
Kesimpulan: Keep Practicing and Have Fun
Learning how to draw a horse takes time and practice, but it’s a rewarding skill that will enhance your artistic abilities. By following the steps outlined in this guide, you’ll be well on your way to creating stunning horse drawings.
So what are you waiting for? Grab your pencil and start drawing. And don’t forget to share your progress with others. Who knows—you might just inspire someone else to pick up a pencil and join you on this creative journey.
Daftar Isi
- Why Learning How to Draw a Horse is Important
- Understanding Horse Anatomy
- Basic Materials You’ll Need to Draw a Horse
- Step-by-Step Guide on How to Draw a Horse
- Tips and Tricks for Drawing a Horse
- Common Mistakes to Avoid When Drawing a Horse
- How to Draw a Horse Head
- How to Draw a Horse in Motion
- How to Draw a Horse’s Mane and Tail
- Resources for Learning How to Draw a Horse


